
How to Install the DAP 'Holy Shift' 6 Speed Manual Short Shifter on your car


Below is a written install of this Holy Shift Short Shifter. If you are looking for more detail on this, we also have a full YouTube video showing this install linked below. This written version is intended to be a more quick reference guide for more advanced DIYers or professionals. If you are new to installs like this, we would recommend watching the video.
Application for the DAP (Holy Shift) Short Shifter - ONLY for 6 Speed Manuals
Audi A3 8P 2006-2008
Audi A3 8P 2009-2013
Audi TT MK1 2000-2006
Audi TT MK2 2007-2014
Audi TTS MK2 2009-2014
Volkswagen 2009-2012 CC
Volkswagen 2013-2017 CC
Volkswagen MK4 R32 2004
Volkswagen MK6 Golf R
Volkswagen MK7 Golf R 2015-2017
Volkswagen MK7.5 Golf-R 2018-2021
Volkswagen MK4 GTI 2001-2005
Volkswagen MK5 GTI 2006-2009
Volkswagen MK6 GTI 2010-2014
Volkswagen MK7 GTI 2015-2017
Volkswagen MK7.5 GTI 2018-2021
Volkswagen MK4 Jetta 2001-2005
Volkswagen MK5 Jetta 2005.5-2010
Volkswagen MK6 Jetta 2011-2018
Volkswagen MK7 Jetta GLI 2019 - Present
Volkswagen MK5/MK6 Sportwagen 2010-2014
Volkswagen MK6 Golf 2010-2014
Volkswagen MK7 Golf Wagon 2015-Present
Volkswagen MK7 Golf Alltrack 2017-Present
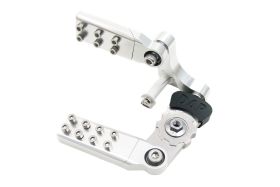
DAP "Holy Shift" 6 Speed Short Shifter Details
How to Install the DAP "Holy Shift" 6 Speed Short Shifter - VIDEO
Purchase a DAP "Holy Shift" 6 Speed Short Shifter
Tools Required
- Small Pick or Flat Head Screwdriver
- 13 mm Socket
- 6 mm Allen
- 4 mm Allen
- Torque Wrench (capable 8-25 Nm)
1. You must start by installing the selector pin into the selector bracket (as shown below). Once you have done this you can install the nut on the back side and tighten to 20 Nm.

2.Take all 14 Allen bolts and Nuts, and install into the long and short shifter end links. These should be left loose to ensure the upper and lower portion have plenty of space to install the shifter cables.

3. We are going to start by removing the shifter boot and trim in the center console. The boot and trim are 1, and cannot be taken apart individually. This has clips around the trim that snap in. To remove this, you will pop this up, as shown below.

4. Make sure your vehicle is in Neutral.
5. Remove the Air Box, or Intake from your vehicle
6. Remove your Battery
7. Remove your Battery Tray
8. Start by loosening the nut on the factory selector on the car

9. Next you are going to locate a small 90° lever on the driver’s side of the transmission. This should be to the right of the selector nut from step 6, if you are standing in front of the car. To lock the transmission in place you are going to apply pressure on the lever towards the passenger side of the car. You may need to move the selector shaft up and down to find the location for the lever.
Once you have found the correct location the pin will drop into place, and you can rotate it clockwise to lock it in place.

10. Now we are going to release the shifter end links from the shifter cables. These use a spring-loaded lock collar to grab onto the cable. To release these, you can slide the collar forward, then turn it to lock into its lock position. This should be performed on both cable ends.

11. Both shift cables should now be loose in the end links.
12 . You can now remove the clip that holds the side to side select lever. This is going to be a white clip that is going to pop up and forward at a diagonal.

13. You can now slide the side-to-side selector lever out towards the driver’s side of the car. To do this you rotate the entire selector out to clear the motor mount.

14. Next you will remove the selector lever on the transmission. This is splined on, and will pull straight up. Often times these splines will collect dirt and debris, it may help to rock the lever side to side while lifting up to get this part out.

15. With your transmission locked, we are going to go inside the car to lock the shift knob in place. This requires dropping a 5mm pin (Supplied with kit - Drill bit shown as alternative) into the hole below, and finding the appropriate hole below the shifter for this to drop into. This is generally slightly back and to the left towards the 8 o’clock position.

16. Now we can install the selector lever onto the shaft on the transmission. This plate will only spline on one way. The splines on the transmission shaft have one place where you will see the splines are different. This is to be lined up with the locating dimple on our selector part. Once lined up correctly this should slide right on.

17. Next, we are going to take the white bushings included with our kit and install one on the new side to side selector lever, and the other into the hole in the transmission on the passenger side.
18. Take the side-to-side selector and slide the stud into the driver’s side hole in the transmission and seat the selector in place.

.
19. Take your Black Delrin Bushing with “DAP” in it and install onto the side-to-side selector.
20. Slide your side-to-side selector back, and position the black DAP bushing over the transmission selector.

21. Install the included metal spring clip onto the selector stud.

22. Take your longer shifter end link and slide this over the cable on the passenger side. Then take the Allen bolt and thread this into the selector on the transmission shaft and hand tighten only.

23. Take your shorter shifter end link and install on the cable towards the driver’s side. We have found it to be best that the bottom side of this end link nuts are located to be facing the engine. You can now install and tighten the Allen bolt for this end link to 20 Nm.

24. Tighten all shift link bolts to 8 Nm.
25. Now you can unlock your transmission by turning the locking pin to the left or counter clockwise.
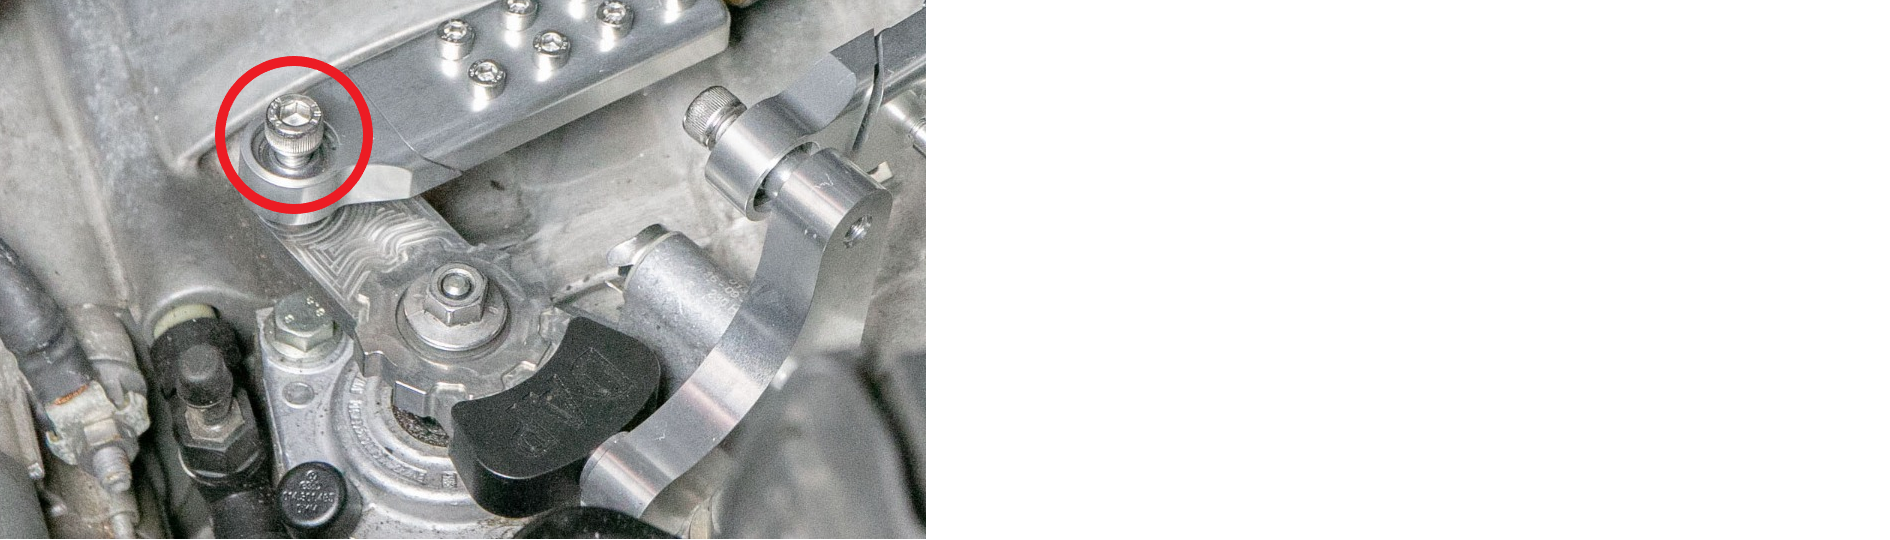
26. Install the nut on the selector on top of the transmission and torque to 25 Nm.
IMPORTANT: if you overtighten this you will snap the stud off this, and you will have to replace the whole shift tower. We recommend unlocking the transmission lock pin from step #9, in rare circumstances we have heard of this breaking off during tightenting.

27. Tighten the Allen bolt for the longer shifter end link to 20 Nm.
28. Remove the pin from your shifter inside the vehicle.
29. Check to ensure you have all gears, including reverse.
IMPORTANT: If you do not have all gears, you have an adjustment issue. You can loosen your end links, then release them from the cables. Then you can lock the shifter inside the car with the 5mm pin, and the one on the transmission using the lever on the transmission. After this you would reinstall your cables.
If you are using a lock pin that allows play in the shifter (IE the lock pin is too small), you may have difficulty getting all gears as this prevents the shifter from being properly adjusted.
30. Install the battery tray, battery and intake
31. Enjoy!!
Quick Reference Torque Specs
- Side to Side Selector Stud Nut (Step 1) – 20 Nm
- Shifter End Links to Shifter Bolt (Step 23/27) – 20 Nm
- Shifter End link Cable Bolts – 4mm Allen (Step 24) – 8 Nm
- Selector Bracket to Transmission Nut (Step 26) 25 Nm – DO NOT OVERTIGHTEN!
About the Author

Related Products


Audi 2.0t TSI Engine Common Problems
2018-03-15

Warehouse Associate - Cornelius NC
2026-05-19


Comments
I'm sure you I will do what ever to get the money